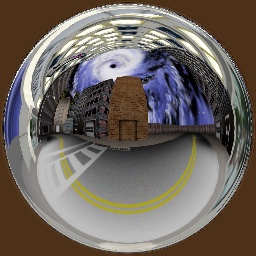
spherical display advice needed (fisheye rendering)

I thought this would be a good project to do:
makezine.com/2011/09/19/pico-pro … l-display/

Any ideas about the shader, or a method in Panda to render scenes like this?

And any ideas what sorts of realtime scenes we could have instead of mere animated earth, moon, etc?

Do you intend for the application to be a game, or just something non-interactive that updates in real-time? If the latter, perhaps something like satellite tracking on a celestial sphere; if the former, perhaps some sort of simple action game in which players have to react to objects appearing on the surface of the sphere, watching for, moving to, and then “shooting” them; in-between, perhaps a sort of simulated wormhole: present an image of a scene that the user can move around in and see from various angles by walking around the sphere. I don’t know how feasible any of these are, but at the least perhaps they’ll spark further ideas. :slight_smile:

Some procedural realtime animations for sure. For example I have some code for day-night cycle. I could get the current OS time from the Gizmo2 and some kind of animation with the background corresponding to the time of day.

Thanks for the ideas.

I tried creating a fisheye view of the scene, but maybe I’m using the wrong class for it.

from panda3d.core import *
import direct.directbase.DirectStart

# scenery
panda=loader.loadModel('panda')
panda.reparentTo(render)
scene=loader.loadModel('environment')
scene.reparentTo(render)


card = FisheyeMaker('name')
#card.setFov(180)
card = NodePath(card.generate())
card.reparentTo(render2d)

run()

I also tried

lens=FisheyeLens()
base.cam.node().setLens(lens)

and got this error

:display(error): wglGraphicsStateGuardian cannot render scene with specified len
s.

No mention of fisheye lens anywhere else.

The FisheyeLens is intended to be used with a NonlinearImager. There’s some sample code floating around the web. I couldn’t find the original, but this seems to be a copy:

code.google.com/p/nbody-panda3d … ome.py?r=2

The class description for NonlinearImager is pretty confusing to me…

No seriously, this is confusing, and I’ve done some low-level procedural geometry and texture stuff with Panda before.

The description of the NonLinearImager class is confusing.
panda3d.org/reference/1.8.0 … p#_details

Logically so is the sample code you found. I edited it a bit to make it simpler and run on current Panda version, but I don’t get what most of the code does.

# Make the camera into a fisheye camera using the NonlinearImager.
import direct.directbase.DirectStart
from pandac.PandaModules import *

# scene
smiley = loader.loadModel('smiley')
smiley.reparentTo(render)
room = loader.loadModel('environment')
room.setPos(0, 0, -10)
room.reparentTo(render)


# A node to attach all the screens together.
screens = NodePath('dark_room')

# A node parented to the original camera node to hold all the new cube
# face cameras.
cubeCam = base.cam.attachNewNode('cubeCam')

# Define the forward vector for the cube.  We have this up to the
# upper right, so we can get away with using only the front, right,
# and up faces if we want.
cubeForward = (1, 1, 1)
#cubeForward = (0, 1, 0)


class CubeFace:
    def __init__(self, name, view, up, res):
        self.name = name

        # A camera, for viewing the world under render.
        self.camNode = Camera('cam' + self.name)
        self.camNode.setScene(render)
        self.cam = cubeCam.attachNewNode(self.camNode)

        # A projector, for projecting the generated image of the world
        # onto our screen.
        self.projNode = LensNode('proj' + self.name)
        self.proj = screens.attachNewNode(self.projNode)

        # A perspective lens, for both of the above.  The same lens is
        # used both to film the world and to project it onto the
        # screen.
        self.lens = PerspectiveLens()
        self.lens.setFov(92)
        self.lens.setNear(0.1)
        self.lens.setFar(10000)
        self.lens.setViewVector(view[0], view[1], view[2],
                                up[0], up[1], up[2])

        self.camNode.setLens(self.lens)
        self.projNode.setLens(self.lens)

        # Now the projection screen itself, which is tied to the
        # projector.
        self.psNode = ProjectionScreen('ps' + self.name)
        self.ps = self.proj.attachNewNode(self.psNode)
        self.psNode.setProjector(self.proj)

        # Generate a flat, rectilinear mesh to project the image onto.
        self.psNode.regenerateScreen(self.proj, "screen", res[0], res[1], 10, 0.97)

# Define the six faces.
cubeFaces = [
    CubeFace('Right', (1, 0, 0), (0, 0, 1), (10, 40)),
    CubeFace('Back', (0, -1, 0), (0, 0, 1), (40, 40)),
    CubeFace('Left', (-1, 0, 0), (0, 0, 1), (10, 40)),
    CubeFace('Front', (0, 1, 0), (0, 0, 1), (20, 20)),
    CubeFace('Up', (0, 0, 1), (0, -1, 0), (40, 10)),
    CubeFace('Down', (0, 0, -1), (0, 1, 0), (40, 10)),
    ]

# Indices into the above.
cri = 0
cbi = 1
cli = 2
cfi = 3
cui = 4
cdi = 5


# Rotate the cube to the forward axis.
cubeCam.lookAt(cubeForward[0], cubeForward[1], cubeForward[2])
m = Mat4()
m.invertFrom(cubeCam.getMat())
cubeCam.setMat(m)

# Get the base display region.
dr = base.camNode.getDisplayRegion(0)

# Now make a fisheye lens to view the whole thing.
fcamNode = Camera('fcam')
fcam = screens.attachNewNode(fcamNode)
flens = FisheyeLens()
flens.setViewVector(cubeForward[0], cubeForward[1], cubeForward[2],  0, 0, 1)
flens.setFov(180)
flens.setFilmSize(dr.getPixelWidth() / 2, dr.getPixelHeight())
fcamNode.setLens(flens)

# And a cylindrical lens for fun.
ccamNode = Camera('ccam')
ccam = screens.attachNewNode(ccamNode)
clens = CylindricalLens()
clens.setViewVector(cubeForward[0], cubeForward[1], cubeForward[2],  0, 0, 1)
clens.setFov(120)
clens.setFilmSize(dr.getPixelWidth() / 2, dr.getPixelHeight())
ccamNode.setLens(clens)

# Turn off the base display region and replace it with two
# side-by-side regions.
dr.setActive(0)
window = dr.getWindow()
dr1 = window.makeDisplayRegion(0, 0.5, 0, 1)
dr1.setSort(dr.getSort())
dr2 = window.makeDisplayRegion(0.5, 1, 0, 1)
dr2.setSort(dr.getSort())

# Set the fisheye lens on the left, and the cylindrical lens on the right.
dr1.setCamera(fcam)
dr2.setCamera(ccam)

# And create the NonlinearImager to do all the fancy stuff.
nli = NonlinearImager()
nli.addViewer(dr1)
nli.addViewer(dr2)

for face in cubeFaces:
    i = nli.addScreen(face.ps, face.name)
    nli.setSourceCamera(i, face.cam)
    nli.setTextureSize(i, 256, 256)

def hideAll():
    for i in range(6):
        nli.setScreenActive(i, 0)

def showAll():
    for i in range(6):
        nli.setScreenActive(i, 1)

hideAll() #?
nli.setScreenActive(cfi, 1)
nli.setScreenActive(cri, 1)
nli.setScreenActive(cui, 1)

run()

I don’t want to give the impression that I’m lazy, here’s the beginning of the NolinearImager class description:

What’s a ‘linear’ camera exactly?

What?

, what does this even mean?
Confusing explanation to me.

Yes, it’s quite confusing, and I don’t exactly understand much about it either. It’s quite complex; I wasn’t able to figure out the NonLinearImager last time I tried to use it.

By a “linear” camera, it is referring to a camera whose projection can be specified by a 4x4 matrix. This applies to perspective and orthographic lenses, but not to a fisheye lens. That’s why it’s called the NonlinearImager - it uses the output of a scene rendered by multiple linear cameras to produce an image as if the original scene had been rendered by a non-linear lens.

This is quite frustrating. I have the hardware set up. Didn’t expect the 3d engine to give me such a hard time. And my deadline is in 10 days.
I’m trying to think of some cheap way to do it, maybe something like normal ‘linear’ offscreen camera with some unusual FOV settings rendering the scene, then applying the render as a texture to a circle with proper UV map, or something…

Perhaps you could explain exactly what you’re trying to achieve in terms of rendering? Most of us here are graphics programmers and not projection engineers. Perhaps someone would be able to help you better if you explained the rendering procedure you had in mind. :slight_smile:

Oh, sorry. I didn’t know it wasn’t clear.
Imagine if you were inside a globe, which had walls made up of LEDS or LCD screens.
Basically something like this:

You could see a 3d scene from any angle by just looking around.

Now imagine it’s not a human size globe which is viewed from the inside, but a small globe which is viewed from the outside, like this.

This doesn’t serve the same purpose and is usually used for rendering spherical objects like the earth, or some artistic renderings like in that photo. I have similar ideas.

Easiest way to do it is to have a video projector projection going through a (real) fisheye lens and covering all of the inside of the globe.

For that the frames have to be transformed accordingly:

Have you seen this project? hackaday.com/?s=car+projector
It seems very similar to what you are proposing in your second link. Might be a cheaper route if you don’t already have a Pico projector.

I’m brand new to Panda3d and have been going through the manuals and forum posts to learn what I can. My 11 year old son wants to learn to program games so I’ve started him out with the book “Adventures in Minecraft” which uses python to make mods for Minecraft (he is obsessed with Minecraft). For continuity sake, I started looking for python engines and came across P3D. I’m familiar with VB and Java script but have never used python before. I think this will be fun for the both of us.

I do have a projector. But thanks for posting :slight_smile:

As for your project, good luck. I think Python will be a great language for your son to get into programming and Minecraft might get him interested in 3d modelling. But please start a separate thread for yourself.

Seems like this would be mostly about getting the math right. You would set up a rig to render the scene into a cube map (I think ShowBase has a convenient function for this). Then you can set up a fullscreen quad with a postprocessing shader, in which you do the calculation to transform the 2D screen coordinate to a 3D scene vector, using which you sample the cube map (cube maps values are sampled simply by passing a 3D direction vector).

Is there any example shader you could find online?
I still don’t know shader programming. I found few examples of doing this with specialized tools or 2d graphics editors, but nothing code related.

The shader is pretty simple to write, it’s the math of mapping a fisheye projection onto a 2D plane that I would have no idea how to figure out.

Not sure I understand.
Which is easy to do?

This nonlinear 180 degree camera (‘equirectangular panorama)’?

Or transforming the above image to this (‘angular fisheye’)?

I can transform one to the other in my editor like so:

I take the panorama image

Distort it like this,

Then finish it off by stretching/scaling along the ‘‘ring’’ like this:

This is why I said I think I can create a 3d subdivided circle with correct UV mapping to transform the panorama to the circular shape, then use render to texture to achieve what I need instead of a fragment shader.
But I don’t know how to render the scene like this in the first place:

So if you have ideas how to do this only, I think that’s all I need.

I think thats just a simple cubemap without the top and bottom faces, and stretched a bit in height.
Have a look at panda3d.org/manual/index.ph … _Cube_Maps.

If you generate a cubemap texture, and then remove the top and bottom faces, and then scale the texture height, I’m pretty sure you will get that result.

Hey. Not really the case I’m afraid. If it was a cylindrical display that could work, but not for a spherical.

Have a look at the Youtube 360 channel. youtube.com/channel/UCzuqhh … zMuM09WKDQ
In these kind of new videos you can rotate at any angle you want, or rotate your phone around to rotate the camera if your phone has that feature.
It works by mapping a video like this shot with a special camera setup/software:

to a UV Sphere:
youtube.com/watch?v=9OXgZQluEbE

You can download the videos with a plugin like DownloadHelper to see how they look prior to being mapped.

Again, videos like this wouldn’t make much sense when viewed “outside” of the sphere instead of from the inside (or with something like Oculus Rift), but just for the sake of example.

EDIT: Found something. Could this be repurposed for Panda?
shadertoy.com/view/XsBSDR

Oh, and I forgot, Panda can render sphere maps, right?
panda3d.org/manual/index.ph … nt_Mapping

If the underlying functions used by the helper function in ShowBase are fast enough to do it realtime, any reason why this isn’t an option?
The angle would need to change to face up, but that’s all I think.

My apologies. Wasn’t trying to hijack your thread. Since that was my first post, I thought I should give a little info to give myself a little cred. Good luck with your project, too.