Interesting. But is the original code working for you?
Because I had to modify the lines:
- 326 (
//)
- 327 (
//)
- 529 (
getPos(self.vlcam))
- 583 (
print(...))
- 587 (
print(...))
Without these changes, my Python crashes with error.
I still have some warnings on the console, but that’s it. It looks like:
Using deprecated DirectStart interface.
Known pipe types:
  CocoaGraphicsPipe
(all display modules loaded.)
:shader(warning): Shader::make() now requires an explicit shader language.  Assuming Cg.
:ShowBase(warning): run() is deprecated, use base.run() instead

Process finished with exit code 0
All code now looks like this:
from panda3d.core import PandaNode,LightNode,TextNode
from panda3d.core import Filename, NodePath
from panda3d.core import PointLight, AmbientLight
from panda3d.core import LightRampAttrib, AuxBitplaneAttrib
from panda3d.core import CardMaker
from panda3d.core import Shader, Texture
from panda3d.core import Point3,Vec4,Vec3,Mat4
# Force non-power-of-2 textures. Important for the VolumetricLighting implementation to work correctly.
#
# Note that we must do this before importing DirectStart (which instantiates ShowBase).
# See
# https://www.panda3d.org/manual/index.php/Accessing_Config_Vars_in_a_Program
#
# Of course, if you already have this setting in your Config.prc, then this effectively does nothing.
#
from panda3d.core import loadPrcFileData
loadPrcFileData( "", "textures-power-2 none" )
import direct.directbase.DirectStart
from direct.task.Task import Task
from direct.actor.Actor import Actor
from direct.gui.OnscreenText import OnscreenText
from direct.showbase.DirectObject import DirectObject
from direct.showbase.BufferViewer import BufferViewer
from direct.filter.CommonFilters import CommonFilters
import sys,os
# A minimal postprocessing shader that additively blends two textures.
#
# We use this to blend the results from the volumetric lighting render
# onto the main render.
#
SHADER_ADDITIVE_BLEND="""//Cg
void vshader(
float4 vtx_position : POSITION,
out float4 l_position : POSITION,
out float2 l_texcoordC : TEXCOORD0,
out float2 l_texcoordV : TEXCOORD1,
uniform float4 texpad_txcolor,
uniform float4 texpad_txvl,
uniform float4x4 mat_modelproj)
{
l_position = mul(mat_modelproj, vtx_position);
l_texcoordC = vtx_position.xz * texpad_txcolor.xy + texpad_txcolor.xy;
l_texcoordV = vtx_position.xz * texpad_txvl.xy + texpad_txvl.xy;
}
void fshader(out float4 o_color : COLOR,
float2 l_texcoordC : TEXCOORD0,
float2 l_texcoordV : TEXCOORD1,
uniform float4 texpix_txcolor,
uniform sampler2D k_txcolor : TEXUNIT0,
uniform float4 texpix_txvl,
uniform sampler2D k_txvl : TEXUNIT1,
uniform float k_strength)
{
float4 c_color = tex2D( k_txcolor, l_texcoordC.xy );
float4 c_vl = tex2D( k_txvl, l_texcoordV.xy );
o_color = saturate( c_color + k_strength*c_vl );
}
"""
# Function to put instructions on the screen.
def addInstructions(pos, msg):
return OnscreenText(text=msg, style=1, fg=(1,1,1,1),
pos=(-1.3, pos), align=TextNode.ALeft, scale = .05)
# Function to put title on the screen.
def addTitle(text):
return OnscreenText(text=text, style=1, fg=(1,1,1,1),
pos=(1.3,-0.95), align=TextNode.ARight, scale = .07)
class VolumetricLightingToonMaker(DirectObject):
def __init__(self):
# Render the main view into a buffer.
#
# We need this to support other postprocessing together with the VolumetricLighting filter.
#
# There is a caveat, though; the occlusion pre-pass will not see postprocessing filter effects,
# and hence anything that falls outside an object outline may be erased by the volumetric light
# when the main and occlusion renders are combined to form the final picture.
#
# This can be corrected by applying the same postprocessing filters to the occlusion pre-pass.
# To do that, there are some practical issues one should be aware of:
#
# - Any postprocessing filters applied to the occlusion buffer must be configured appropriately;
# this does NOT necessarily mean the exact same options as used in the main render.
#
# In the occlusion buffer, we must do for example the following:
# - All "object-like" things should be rendered black.
# - This includes any postprocessing that makes more pixels "object-like"
# than already are in the basic occlusion render.
# - For example, cartoon ink should be made completely black, RGBA=(0,0,0,1),
# regardless of desired final ink color. The ink color should be applied
# in the postprocessing for the main render.
#
# - Any additional "light-like" things (except the bright object representing
# the VolumetricLighting caster) should probably be disabled.
# - Any additional bright pixels will cast rays, but centered on VolumetricLighting's caster
# instead of on the local center of each bright area. In most situations, this is probably
# undesirable. (But may be useful to keep in mind as a special effect.)
# - For example, bloom should *not* be set on the occlusion buffer.
#
# - Blur should render blurred object outlines with varying alpha.
# This is achieved by setting a zero-alpha fill color to the occlusion camera.
# The main camera can render normally.
#
# - Procedural lens flare (coming soon based on the code by ninth) should be rendered
# in both buffers, so that it takes into account bright pixels in both the occlusion
# buffer and the main render.
#
# - As of 1.8.1, the current design of CommonFilters is single stage only, hence VolumetricLighting
# (which is a part of CommonFilters) might or might not see the other filters applied
# in its input, depending on implementation details of the other filters.
#
# - Performance. This doubles the amount work that the postprocessing filters must do.
# Using a half-size, downscaled occlusion buffer (see "div" below) helps somewhat,
# reducing the additional load for the postprocessing fragment shaders from 100% to 25%.
#
# Thus, the exact result when other postprocessing is enabled is dependent on
# which filters are used and whether they can be configured to do the right thing
# in the instance that renders to the occlusion buffer; your mileage may vary.
#
self.renderbuffer = base.win.makeTextureBuffer("SceneRender",
base.win.getXSize(),
base.win.getYSize())
self.rendercam = base.makeCamera(self.renderbuffer)
scenetex = self.renderbuffer.getTexture()
# Set up the camera and mouse control.
#
# https://www.panda3d.org/manual/index.php/Mouse_Support
#
base.disableMouse()
base.cam.node().getLens().setNear(10.0)
base.cam.node().getLens().setFar(200.0)
camera.setPos(-30, 50, 0)
camera.lookAt(0,0,0)
mat=Mat4(camera.getMat())
mat.invertInPlace()
base.mouseInterfaceNode.setMat(mat)
base.enableMouse()
# Check video card capabilities.
if (base.win.getGsg().getSupportsBasicShaders() == 0):
addTitle("Toon Shader: Video driver reports that shaders are not supported.")
return
# In addition to volumetric lighting, we will do cartoon shading (see the cartoon shading tutorial).
# Make a light ramp.
tempnode = NodePath(PandaNode("temp node"))
# For version 1.8.1
#
tempnode.setAttrib(LightRampAttrib.makeSingleThreshold(thresh0=0.5, lev0=0.8))
# # For 1.8.1 with the "cartoon shader improvements" patch.
# #
# # We utilize the new features introduced in the patch, making
# # the light/dark transitions smooth and making the light ramp
# # affect also the specular component of lighting.
# #
# # The parameter smooth0 uses the same units as thresh0.
# #
# tempnode.setAttrib(LightRampAttrib.makeSingleThreshold(thresh0=0.5, lev0=0.8,
# smooth0=0.01, affect_specular=True))
tempnode.setShaderAuto() # enable autoshader (this enables the light ramp)
self.rendercam.node().setInitialState(tempnode.getState())
# Enable cartoon inking.
self.filters = CommonFilters(self.renderbuffer, self.rendercam)
# 1.8.1
filterok = self.filters.setCartoonInk(color=(0,0,0,0.75))
# # 1.8.1 with "cartoon shader improvements"
# filterok = self.filters.setCartoonInk(color=(0,0,0,0.75), antialias=True)
# Bloom is another part of simulating a bright (high contrast) light.
#
# Enable auto-blooming for bright pixels in the main render.
#
filterok = filterok and self.filters.setBloom( blend = (0.3, 0.4, 0.3, 0.0), # lum = dot(RGBA,blend)
mintrigger = 0.6, # default: 0.6,
maxtrigger = 1.0,
desat = 0.1, # default: 0.6,
intensity = 0.6, # default: 1.0,
size = "small" )
if (filterok == False):
addTitle("Video card not powerful enough to do image postprocessing")
return
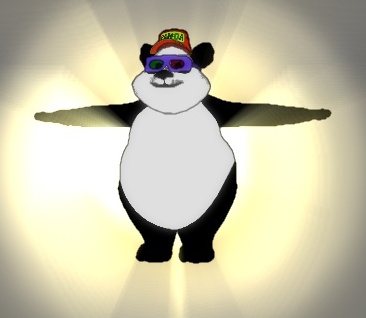
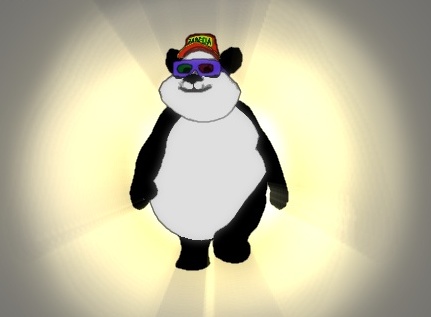
# Load the panda model (that comes with Panda3D) and position it appropriately.
self.character = Actor()
self.character.loadModel('models/panda')
self.character.reparentTo(render)
self.character.setPos(Point3(0,0,-5))
self.character.setHpr(Point3(200,0,0))
# # Optional: animate the model.
# #
# self.character.loadAnims({'walk': 'models/panda-walk'})
# self.character.loop('walk')
# # Optional: make the model slide back and forth in front of the light
# # to demonstrate how the volumetric rays behave when objects move.
# #
# from direct.interval.IntervalGlobal import Sequence
# self.character.setPos( Point3(10,0,-5) )
# mydur = 3.0
# I1 = self.character.posInterval(duration=mydur, pos=Point3(-10,0,-5), blendType="easeInOut")
# I2 = self.character.posInterval(duration=mydur, pos=Point3( 10,0,-5), blendType="easeInOut")
# Sequence(I1,I2, name="character mover").loop() # or .start() to play just once
# Create a non-attenuating point light and an ambient light.
plightnode = PointLight("point light")
plightnode.setAttenuation(Vec3(1,0,0))
plight = render.attachNewNode(plightnode)
plight.setPos(30,-50,0)
alightnode = AmbientLight("ambient light")
alightnode.setColor(Vec4(0.8,0.8,0.8,1))
alight = render.attachNewNode(alightnode)
render.setLight(alight)
render.setLight(plight)
##############################
# Volumetric lighting setup
##############################
# To get an idea how the filter is supposed to work, refer to
# NVIDIA: GPU Gems 3, chapter 13:
#
# http://http.developer.nvidia.com/GPUGems3/gpugems3_ch13.html
# Specify light source to act as source of the light rays.
#
# This can be any NodePath (does not have to be a light), but the effect
# looks the most natural if the caster is a light (point, directional or spot).
#
# Keep in mind that the actual volumetric "light" that generates the rays
# has nothing to do with actual scene lighting, but is simply a
# postprocessing effect. Hence, it does not actually illuminate any objects!
# The illusion of illuminating the air comes from the bright look of the
# texture that we use to represent the light source.
#
# Also, keep in mind that the simple billboarded texture card approach
# knows nothing about the angle a spotlight is pointing at; this example
# looks most natural for point and directional lights.
#
# Here we use a point light.
#
self.caster = plight
# Create a visual representation of the light using a billboarded "fuzzy dot light" texture.
#
from panda3d.core import CardMaker, TransparencyAttrib
cm = CardMaker('card')
# To center the texture, center the card around the local origin.
# This is important to make the rays flow out from the center point of the texture.
cm.setFrame( ll=Point3(-0.5, 0, -0.5), lr=Point3( 0.5, 0, -0.5),
ur=Point3( 0.5, 0, 0.5), ul=Point3(-0.5, 0, 0.5) )
# Create the card geometry and parent it to the light.
card = self.caster.attachNewNode(cm.generate())
card.setBillboardPointEye()
card.setTexture(loader.loadTexture('tex/flare5.png')) # texture from ninth's lens flare example
card.setTransparency(TransparencyAttrib.MAlpha)
card.setPos(Point3(0,0,0))
card.setScale(50) # Make the card bigger.
card.setLightOff() # Lighting shouldn't affect the card, because
# the texture represents a light source as-is.
card.setShaderAuto()
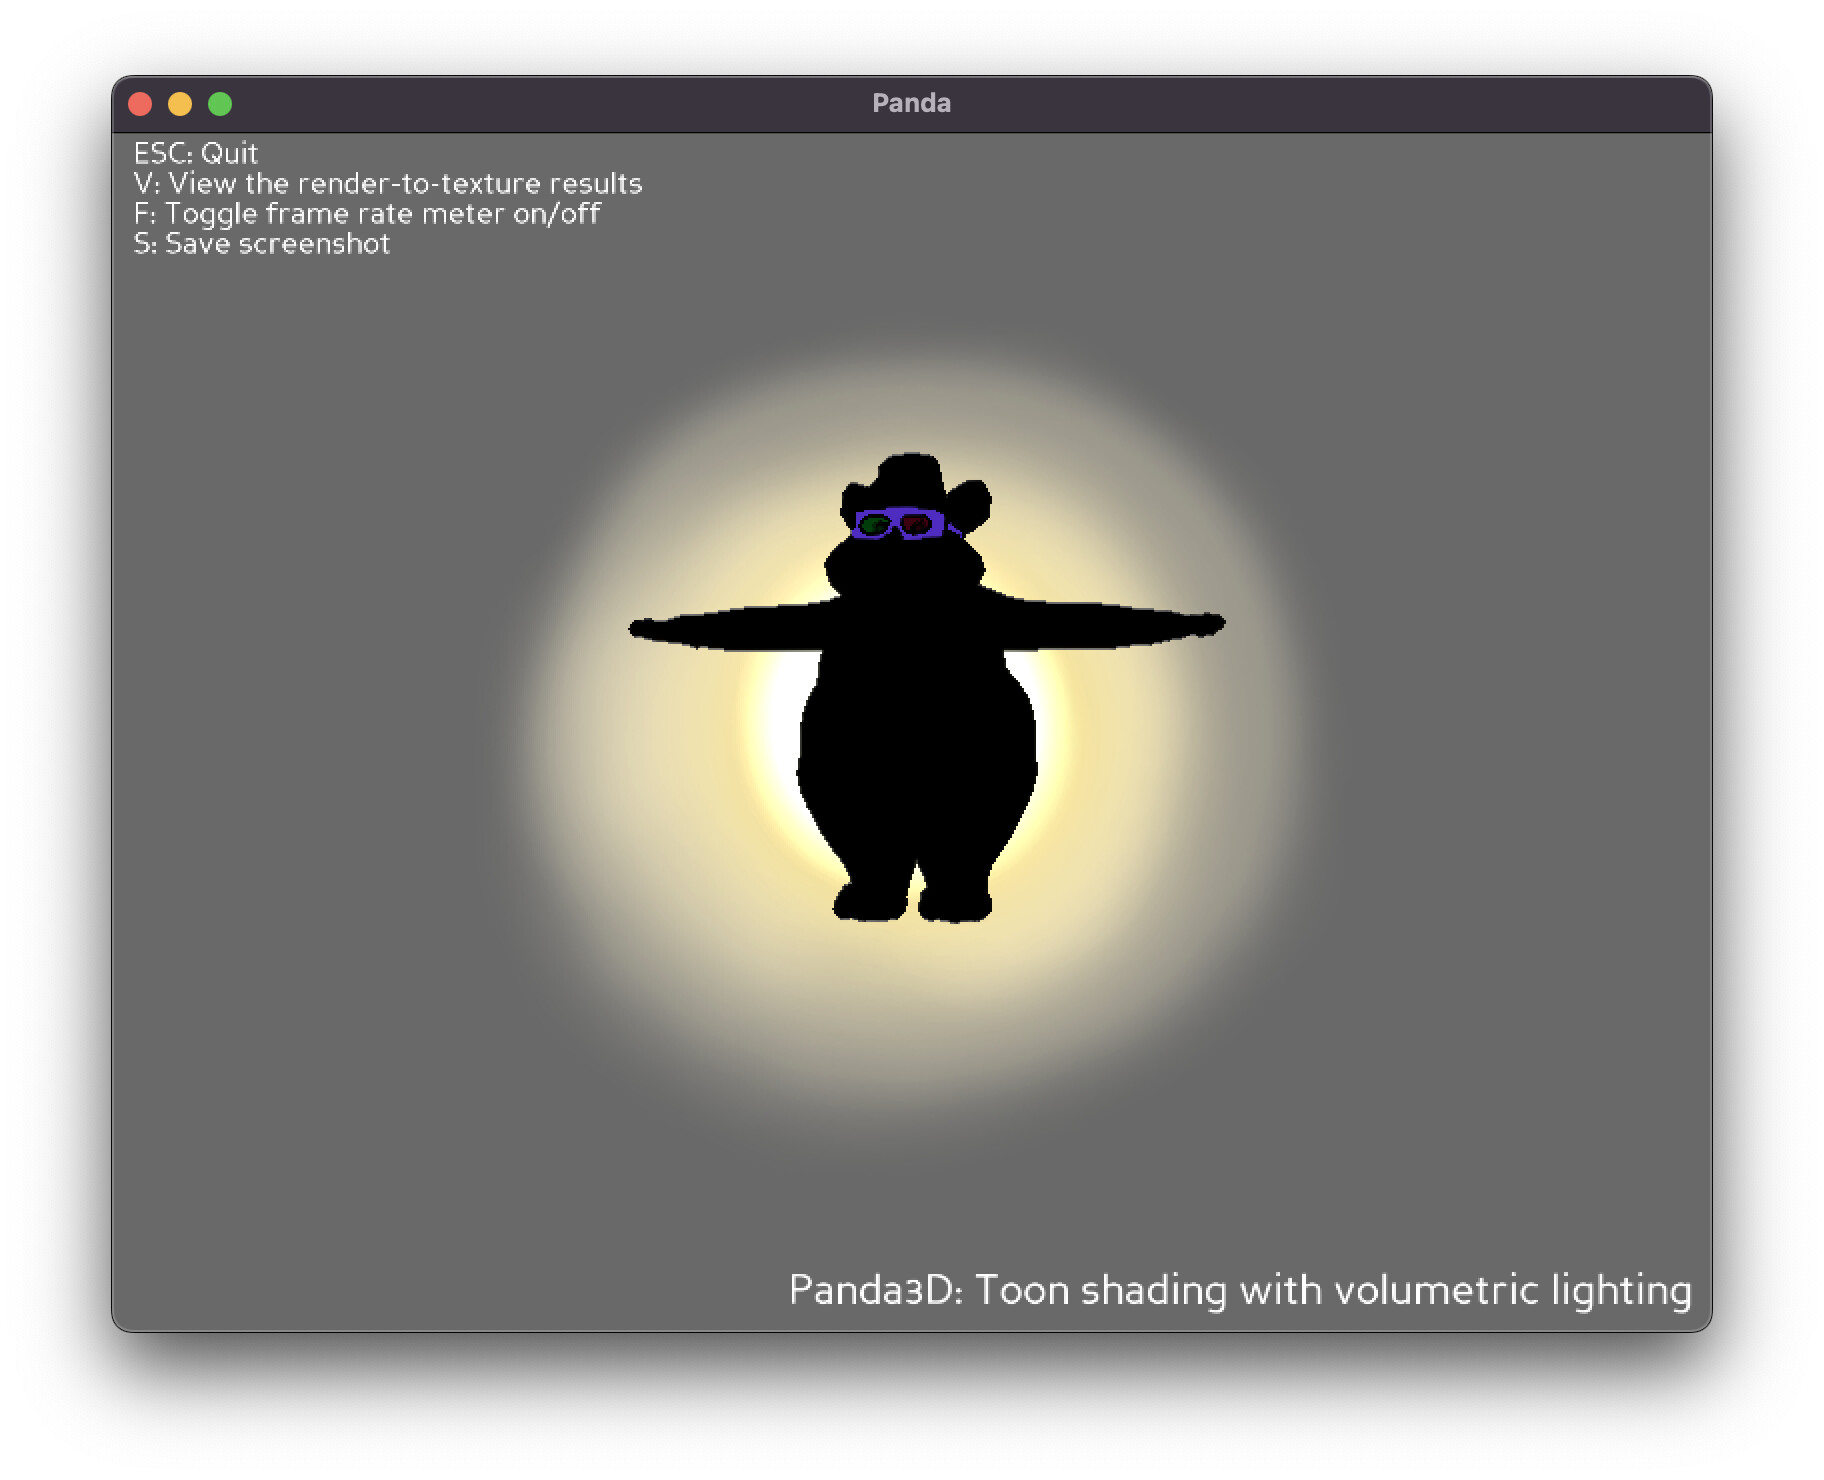
# Next, we set up the occlusion pre-pass - the magic behind the VolumetricLighting filter.
#
# Make an offscreen buffer and camera, rendering all objects except the light card as black.
#
# If we use the main render as input to VolumetricLighting instead of making a separate
# occlusion pre-pass, even moderately bright objects will cast silly-colored light rays
# into the volumetric light instead of casting shadows. (GPU Gems 3, section 13.5,
# calls this "undesirable streaks due to surface texture variations".)
#
# Rendering everything as black makes the objects shadow the light when the VolumetricLighting
# filter postprocesses this buffer, assuming that the caster is behind the objects.
# If the caster is in front, the objects will cast "light rays" (erroneously) instead of
# shadowing the light. (It seems this is a property of the VolumetricLighting algorithm.)
#
# We eliminate this artifact by dynamically updating the far distance of the occlusion buffer camera
# in an update task, so that objects further away from the viewer than the caster will
# not be drawn into this buffer, and hence such objects will not cast any rays.
#
#
# (Sometimes such "light rays" can be useful, e.g. for creating a radially glowing sun like in:
#
# http://www.panda3d.org/forums/viewtopic.php?t=13936
#
# This effect can make the sun appear more 'alive' in space scenes, providing an alternative
# for (or another technique in addition to) rotating starburst cards. In this case,
# a textured mesh is used as caster instead of a billboarded card.
#
# Note that to get only the sun to glow, it should be the only object rendered into the
# pre-pass buffer, and it should be rendered in the usual manner, not as black.
# Recall that objects can be hidden using camera masks. We will use this technique
# to hide the lighting card from the main camera below, to prevent the card from
# being rendered twice.)
#
#
# div = 2 # it is possible to make the texture smaller than the window to render faster
div = 1 # of course, full size gives best quality especially near object outlines
self.vlbuffer = base.win.makeTextureBuffer("VolumetricLighting",
base.win.getXSize() // div,
base.win.getYSize() // div)
self.vlbuffer.setClearColor(Vec4(0, 0, 0, 0))
self.vlcam = base.makeCamera(self.vlbuffer)
# # Be aware that if we modify any camera settings for vlcam, we must match the settings
# # of rendercam! (E.g. a different FOV would cause the object to be the wrong size
# # in the occlusion buffer.)
# #
# self.vlcam.node().getLens().setNear(10.0)
# self.vlcam.node().getLens().setFar(200.0)
# self.vlcam.node().getLens().setFov(90)
# We set a ridiculously high priority (10000) on these settings
# to override the same settings in any nodes that might have them.
#
tempNP = NodePath("temp node")
tempNP.setColor(0,0,0,1,10000)
tempNP.setColorScale(0,0,0,1,10000)
tempNP.setShaderOff(10000)
tempNP.setMaterialOff(10000)
self.vlcam.node().setInitialState(tempNP.getState())
# Set up the task to update occlusion parameters at each frame.
#
# We use a high priority to make sure this runs before the frame is rendered.
# (This ordering is important to correctly account for fast motion of objects or the camera.)
#
taskMgr.add( lambda task : self.occlusionUpdateTask(task),
'VolumetricLightingOcclusionUpdateTask', priority=10000, sort=0 )
# Set up an instance of CommonFilters and enable VolumetricLighting *on the vlbuffer camera*.
#
self.vlfilters = CommonFilters(self.vlbuffer, self.vlcam)
# high quality
self.vlfilters.setVolumetricLighting(caster=self.caster, numsamples=32, density=0.6, decay=0.98)
# low quality, faster (but div=2 helps in making this look relatively good!)
# self.vlfilters.setVolumetricLighting(caster=self.caster, numsamples=16, density=0.5, decay=0.98)
# Set up postprocessing for the occlusion pre-pass.
#
# We duplicate the cartoon inking in the vlbuffer, but as completely black.
#
# All other inking settings should be configured the same as in the main view,
# to ensure that pixels at the corresponding screen coordinates are inked
# in both buffers.
#
# (But not necessarily the same pixels, if div != 1; instead, it will be
# the best approximation that the resolution of the occlusion buffer allows.)
#
# This step is important, as it makes the occlusion pass see the inked pixels
# as occluded even if they happen to be outside the object outline.
#
# Note that because the main autoshader is disabled for the occlusion buffer,
# there will not be any sensible data in the normal map (bug in 1.8.1); hence
# this will not work properly without the "cartoon shader improvements" patch,
# which adds (optional, enabled by default) depth buffer based edge detection to the inker.
# 1.8.1
self.vlfilters.setCartoonInk( color=(0,0,0,1) )
# # 1.8.1 with "cartoon shader improvements"
# self.vlfilters.setCartoonInk( color=(0,0,0,1), antialias=True )
# We will use the resulting texture from the pre-pass as input for the finalquad shader.
#
vltex = self.vlbuffer.getTexture()
# Set up the final quad to receive the combined result from the two renders.
#
# If we use CommonFilters in our main render view, we must render to a buffer
# and capture the texture from that buffer (see "scenetex" above) to get the image
# that has the postprocessing applied.
# # If we had a scene with no postprocessing except VolumetricLighting
# # (i.e. where the main render is not postprocessed), we could skip rendering
# # to a buffer, using the default rendering setup instead, and do as follows:
# #
# from direct.filter import FilterManager
# manager = FilterManager.FilterManager(base.win, base.cam)
# scenetex = Texture()
# self.quadNodePath = manager.renderSceneInto(colortex=scenetex)
# But since we use CommonFilters, we must (as of 1.8.1) instead create
# the final quad (self.quadNodePath) ourselves, using the following setup.
#
# This sort of emulates what FilterManager does, but in a setup where
# we are already rendering into a quad (the one set up by CommonFilters).
#
quadscene = NodePath("filter-quad-scene")
quadcamera = base.makeCamera2d(base.win, sort=7)
quadcamera.reparentTo(quadscene)
cm = CardMaker("filter-quad-card")
cm.setFrameFullscreenQuad()
self.quadNodePath = NodePath(cm.generate())
finaltex = Texture()
self.quadNodePath.setTexture(finaltex)
self.quadNodePath.reparentTo(quadcamera)
# Set up a shader on the final quad to compose the color and volumetric lighting textures
# into the final output.
#
# The light from the VL texture is blended additively onto the color texture, saturating to 1.0.
#
self.quadNodePath.setShader(Shader.make(SHADER_ADDITIVE_BLEND))
self.quadNodePath.setShaderInput("txcolor", scenetex)
self.quadNodePath.setShaderInput("txvl", vltex)
self.quadNodePath.setShaderInput("strength", 1.0)
# Tag the cameras with bitmasks to enable selective object hiding.
#
from panda3d.core import BitMask32
RENDERCAM_MASK = BitMask32.bit(0)
VLCAM_MASK = BitMask32.bit(1)
self.rendercam.node().setCameraMask(RENDERCAM_MASK)
self.vlcam.node().setCameraMask(VLCAM_MASK)
# In the card NodePath, override the vlcam settings.
#
# The "blackening" settings must be overridden manually by setting them to reasonable values,
# because color and colorscale are not yet part of the card's state. (Hence, even setting
# an overriding priority would not have any effect on them.)
#
# Setting the color of the card to RGBA=(1,1,1,1) means that the texture is used as-is
# (when lighting is disabled, as it is for the card).
#
# Using any other color means the texture color is modulated by the given color.
#
# Note that this implies that the texture should be white-ish (or even grayscale)
# if you wish to be able to tint it toward any color, because the modulation
# is multiplicative.
#
# TODO: tint automatically using the light's color?
#
card.setColor(1,1,1,1) # render rays by using the card texture as-is
# card.setColor(0.6,0.6,1,1) # example: tint the card texture toward blue
# card.setColor(1,0.8,0.6,1) # example: tint toward orange
card.setColorScale(1,1,1,1)
card.setState(card.getState().adjustAllPriorities(20000))
# Make vlcam see the card, but hide it from the main render camera.
#
# (The final blending step already adds the card (and the rays) onto the final output;
# we should not render it twice.)
#
card.hide(RENDERCAM_MASK)
card.show(VLCAM_MASK)
# Now the setup is complete.
# # If desired, we can enable one more set of filters to postprocess the final result
# # after the blending.
# #
# self.finalfilters = CommonFilters(base.win, quadcamera)
# self.finalfilters.setBloom()
# self.finalfilters.setBlurSharpen()
################################
# End volumetric lighting setup
################################
# Do some final setup for the user interface of this example program.
# Post the instructions.
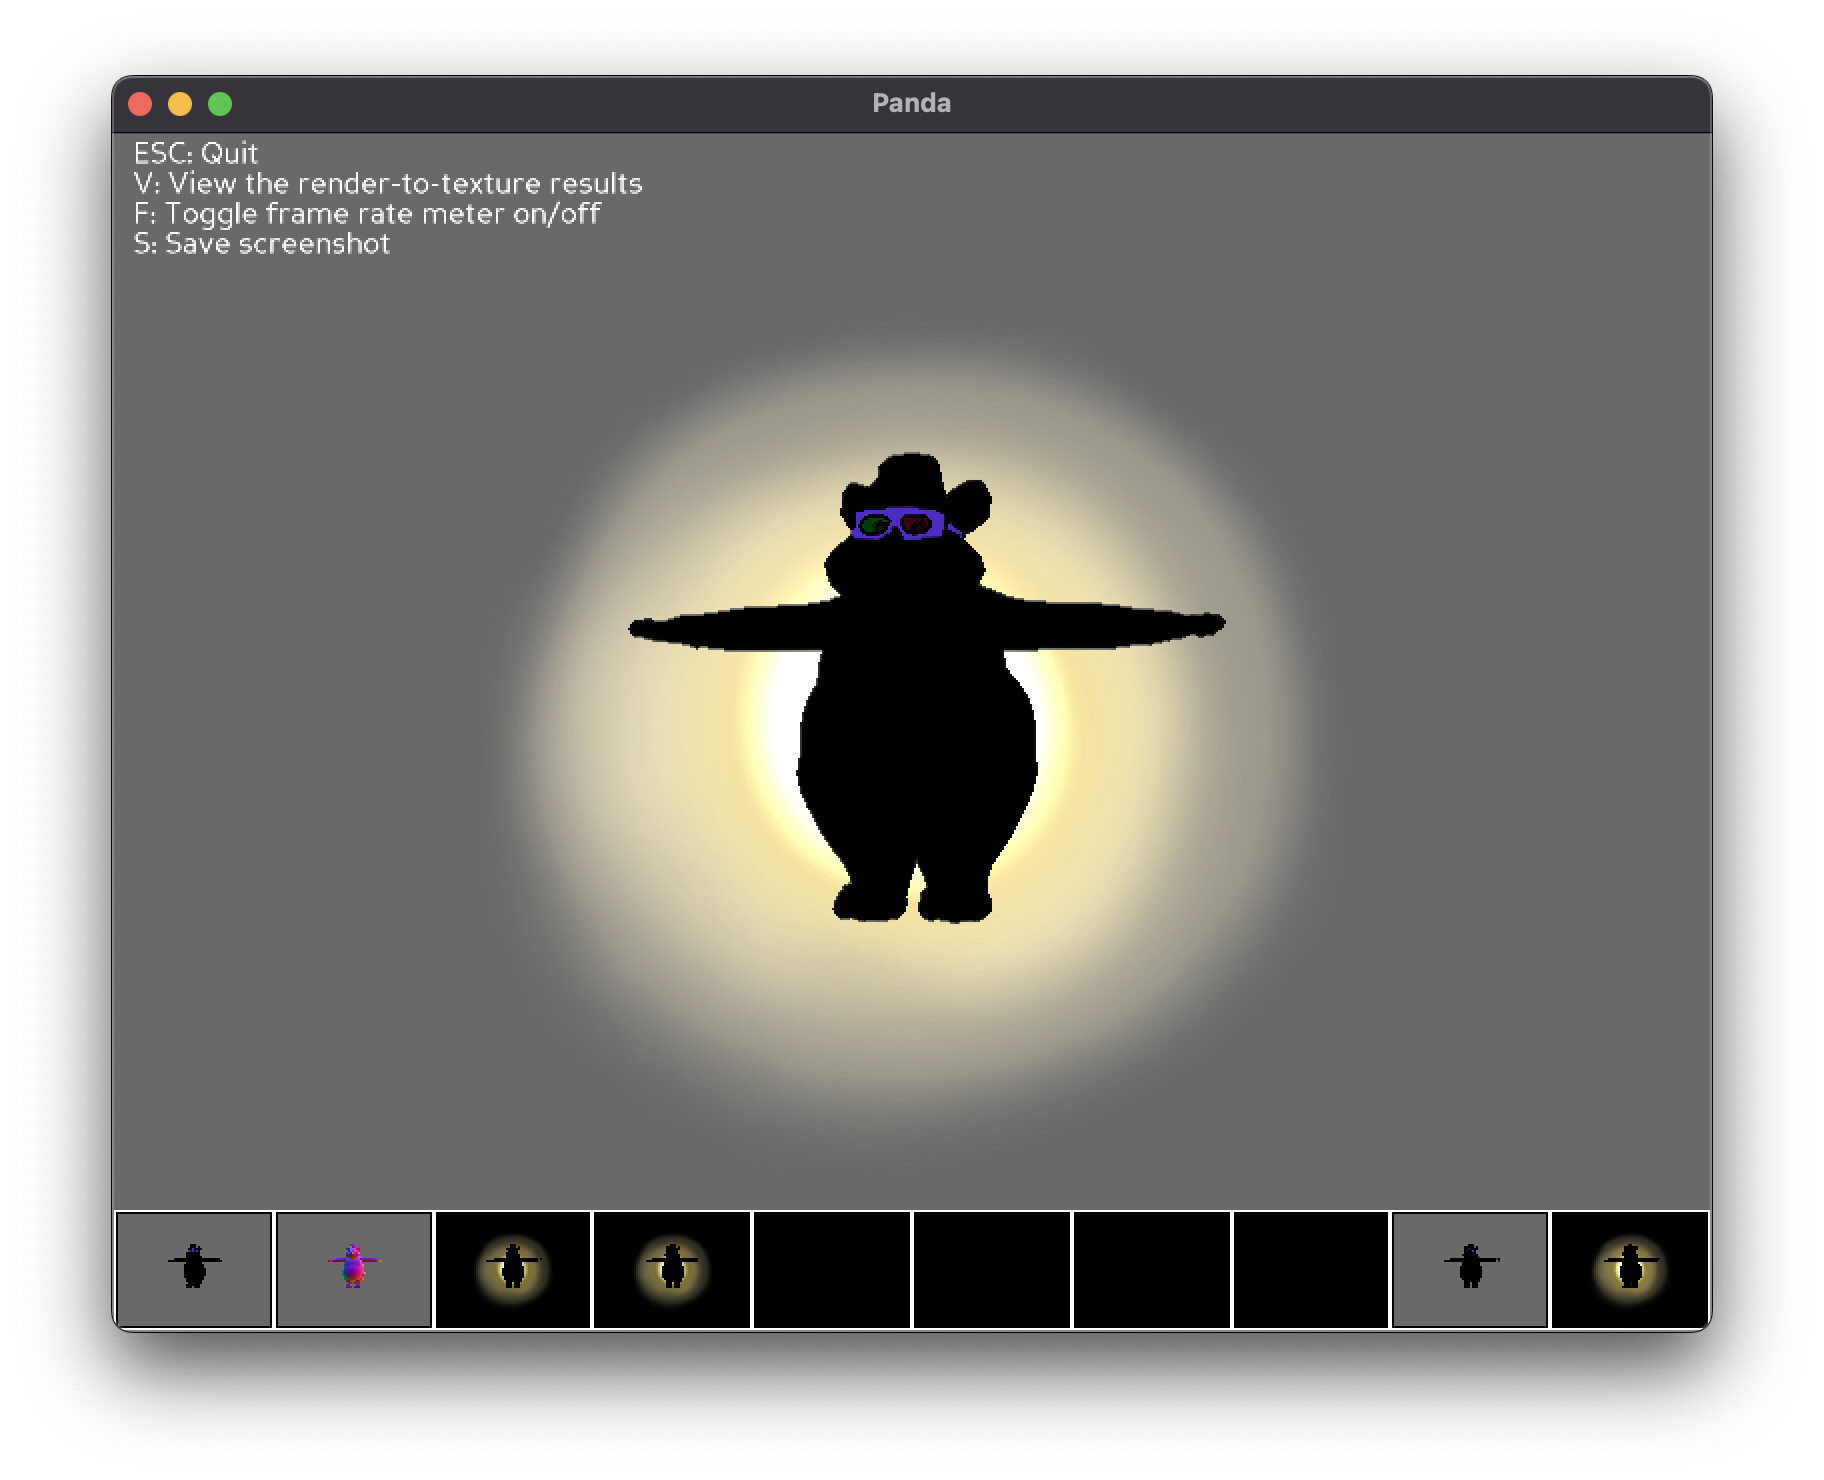
self.title = addTitle("Panda3D: Toon shading with volumetric lighting")
self.inst1 = addInstructions(0.95,"ESC: Quit")
self.inst2 = addInstructions(0.90,"V: View the render-to-texture results")
self.inst3 = addInstructions(0.85,"F: Toggle frame rate meter on/off")
self.inst4 = addInstructions(0.80,"S: Save screenshot")
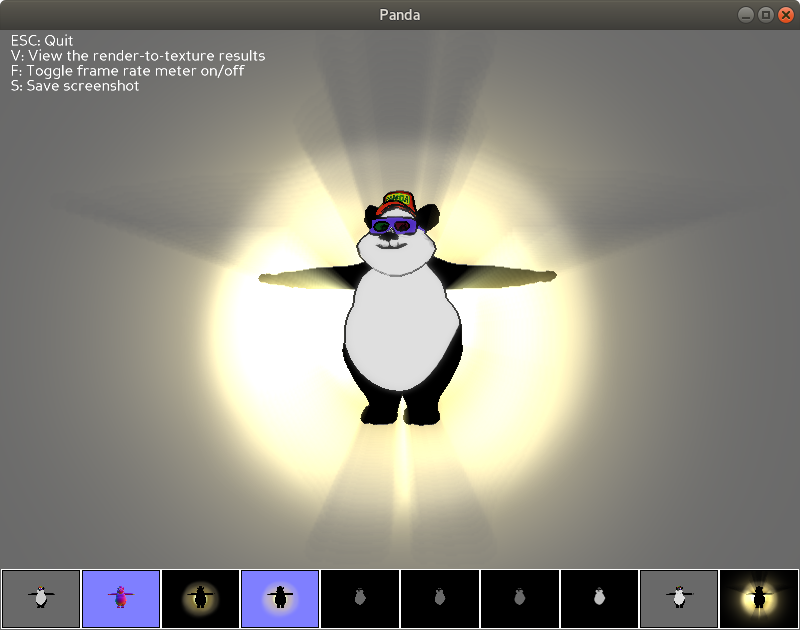
# Trap the keys.
# Panda contains a built-in viewer that lets you view the
# results of all render-to-texture operations. This lets you
# see what class CommonFilters is doing behind the scenes.
self.accept("v", base.bufferViewer.toggleEnable)
self.accept("V", base.bufferViewer.toggleEnable)
base.bufferViewer.setPosition("llcorner")
# self.accept("s", self.filters.manager.resizeBuffers)
self.accept("escape", sys.exit, [0])
self.fpsMeter = False
self.accept("f", self.toggleFramerateMeter)
self.accept("F", self.toggleFramerateMeter)
self.ssfilename_counter = 0
self.accept("s", self.saveScreenshot)
self.accept("S", self.saveScreenshot)
# Update task for dynamically updating occlusion parameters for the volumetric light rendering.
#
# This should be set up to run at a high priority to ensure update before each frame is rendered.
#
def occlusionUpdateTask(self, task):
# Update the far distance of the occlusion camera.
#
# We make the occlusion camera see only objects that are in front of the light,
# i.e. those objects that should participate in occlusion.
#
p = self.caster.getPos(self.vlcam) # vector pointing from camera origin to caster
# p[1] = distance of caster, component along the view axis (camera's y)
# 0.1% = safety margin to ensure the card representing the light is rendered
#
self.vlcam.node().getLens().setFar( p[1] * 1.001 )
# Implement an artifact-reducing suggestion from GPU Gems 3, section 13.6:
#
# Fade out the volumetric rays as the light approaches the plane perpendicular
# to the view axis. This eliminates the problem of potentially large sample separation,
# as the coordinates of the light tend to infinity on the camera plane. (Without this,
# if the light is on the camera plane, and far away from the view, the separation
# between adjacent samples will be large and the "ray" effect breaks down.)
#
# We do this using a "volumetric light strength" parameter in our final-step shader.
#
# Directional cosine between view axis and p. Negative values should be discarded,
# as they correspond to the light being behind the camera.
#
from math import sqrt
p_norm = sqrt(p.dot(p))
f = max(0.0, Vec3(0,1,0).dot(p/p_norm))
self.quadNodePath.setShaderInput("strength", f)
return task.cont
# Panda can show us the current framerate.
#
def toggleFramerateMeter(self):
self.fpsMeter = not self.fpsMeter
base.setFrameRateMeter(self.fpsMeter)
# Save a screenshot to a uniquely numbered file.
#
def saveScreenshot(self):
ulim = 99999 # %05d
def generateFileName():
self.ssfilename_counter += 1
return "Tut-Cartoon-Basic-190_py_screenshot_%05d.jpg" % self.ssfilename_counter
# find a filename that does not correspond to an existing file
#
import os.path
done = False
while not done and self.ssfilename_counter <= ulim:
filename = generateFileName()
if not os.path.isfile(filename):
done = True
break
if not done:
print("ERROR: Screenshot failed: no free filename")
return
base.win.saveScreenshot(filename)
print("Screenshot saved to %s." % filename)
t = VolumetricLightingToonMaker()
run()