We’ve been working hard for the past months to update the OpenGL renderer and bring support for the latest and greatest features that OpenGL has to offer. We’ve not been very good at updating the blog, though, so we decided to make a post highlighting some of those features and how they are implemented into Panda3D. These features will be part of the upcoming Panda3D 1.9.0 release, which should come out within the following month, assuming that everything goes according to plan.
sRGB support (linear pipeline)
Virtually all lighting and blending calculations are written under the assumption that they happen in a linear space, meaning that multiplying a color value with x results in a color value that is x times as bright. However, what is often overlooked by game developers is the fact that the average monitor isn’t linear. CRT monitors have a gamma of around 2.2, meaning that the output luminosity was proportional to the input voltage raised to the power of 2.2. This means that a pixel value of 0.5 brightness isn’t actually half as bright as one of 1.0 brightness, but only around 0.22 times as bright! To compensate for this, content is produced in the sRGB color space, which has a built-in gamma correction of around 1/2.2. Modern monitors and digital cameras are calibrated to use that standard, so that no gamma correction is typically needed to display images in an image viewer or in the browser.
However, this presents an issue for 3D engines that perform lighting and blending calculations. Because both the input and output color space are non-linear, when you have a light that is supposed to attenuate colors to 0.5x brightness, it will actually cause it to show up with 0.22x brightness—more than twice as dark as it should be! This results in dark areas appearing too dark, and the transition between dark and bright areas will look very unnatural. To have a proper linear lighting pipeline, what we have to do is correct for the gamma on both the input and the output side: we have to convert our input textures to linear space, and we have to convert the rendered output back to sRGB space.
It’s very easy for developers to overlook or dismiss this issue as being unimportant, because it doesn’t really affect unlit textures; they look roughly the same because the two wrongs cancel each other out. Developers simply tweak the lighting values to compensate for the incorrect light ramps until it looks acceptable. However, until you properly address gamma correction, your lighting will look wrong. The transition between light and dark will look unnatural, and people may see banding artifacts around specular highlights. This also applies when using techniques like physically based rendering, where it is more important that the lights behave like they would actually behave in real life.
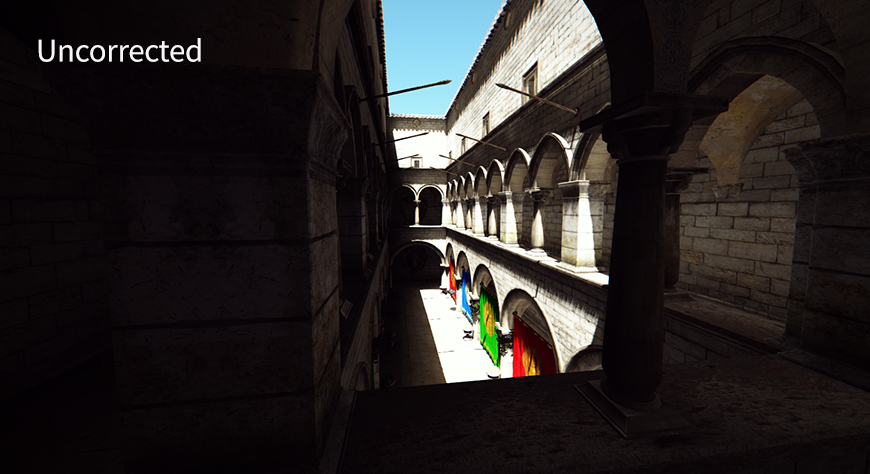
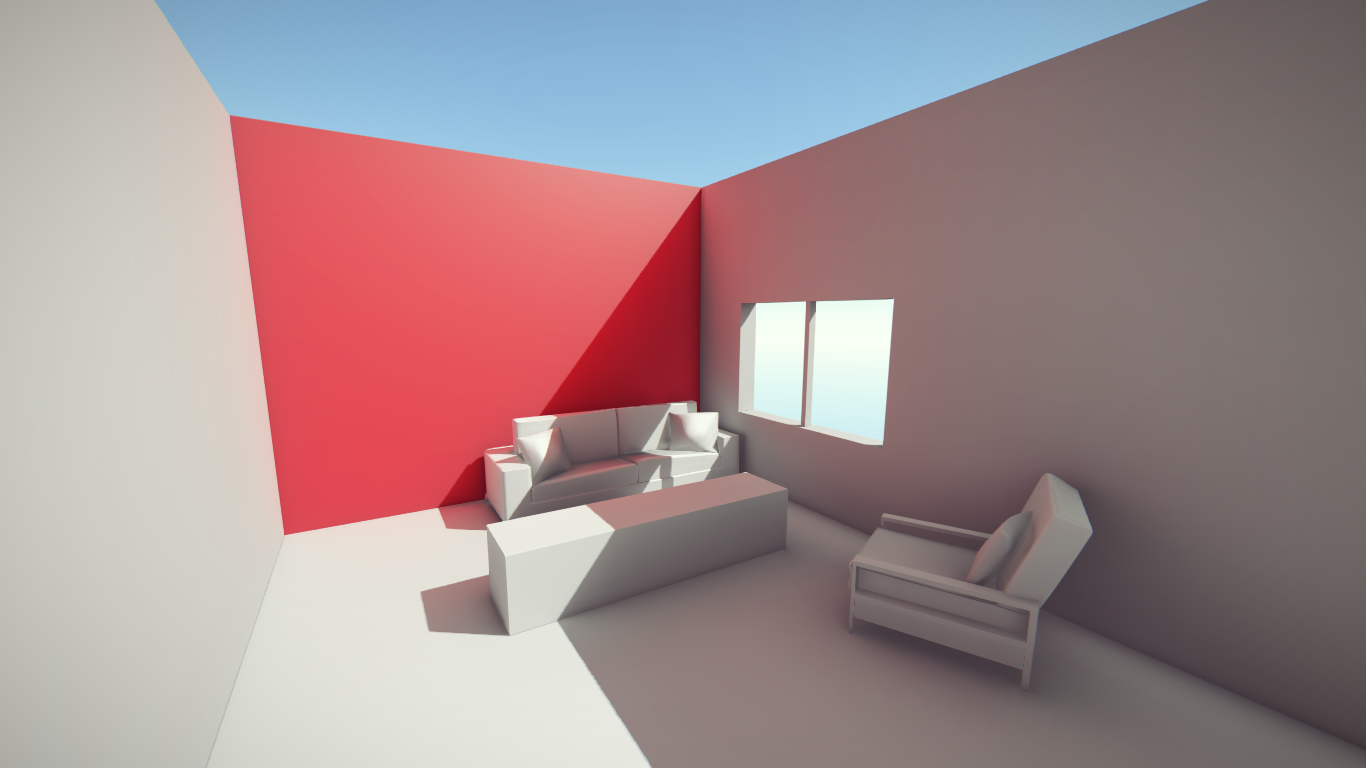
The screenshots below show a scene rendered in Panda3D using physically-based rendering with and without gamma correction. Note how the left image looks far too dark whereas the right image has a far more natural-looking balance of lighting. Click to enlarge.
Fortunately, we now have support for a range of hardware features that can correct for all of these issues automatically—for free. There are two parts to this: sRGB framebuffers and sRGB textures. If the former is enabled, you’re telling OpenGL that the framebuffer is in the sRGB color space, and will let us do all of the lighting calculations in linear space, and will then gamma-adjust it before displaying it on the monitor. However, just doing that would cause your textures to look way too bright since they are already gamma-corrected! Therefore, you can set your textures to the sRGB format to indicate to OpenGL that they are in the sRGB color space, and that they should therefore automatically be converted to linear space when they are sampled.
The nice thing is that all of these operations are virtually free, because they are nowadays implemented in hardware. These features have existed for a long time, and you can rely on the vast majority of modern graphics hardware to correctly implement sRGB support. We’ve added support to the Direct3D 9 renderer as well, and even to our software renderer! However, keep in mind that you can’t always rely on a monitor being calibrated to 2.2 gamma, and therefore it is always best to have a screen that allows the user to calibrate the application’s gamma. We’ve added a special post-processing filter that applies an additional gamma correction to help with that.
To read more about color spaces in the future Panda3D version, check out this manual page, although the details are still subject to change.
Tessellation shaders
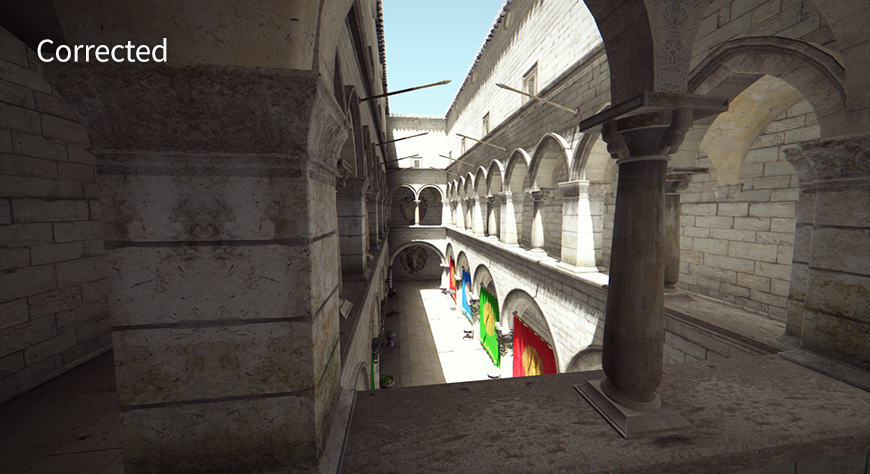
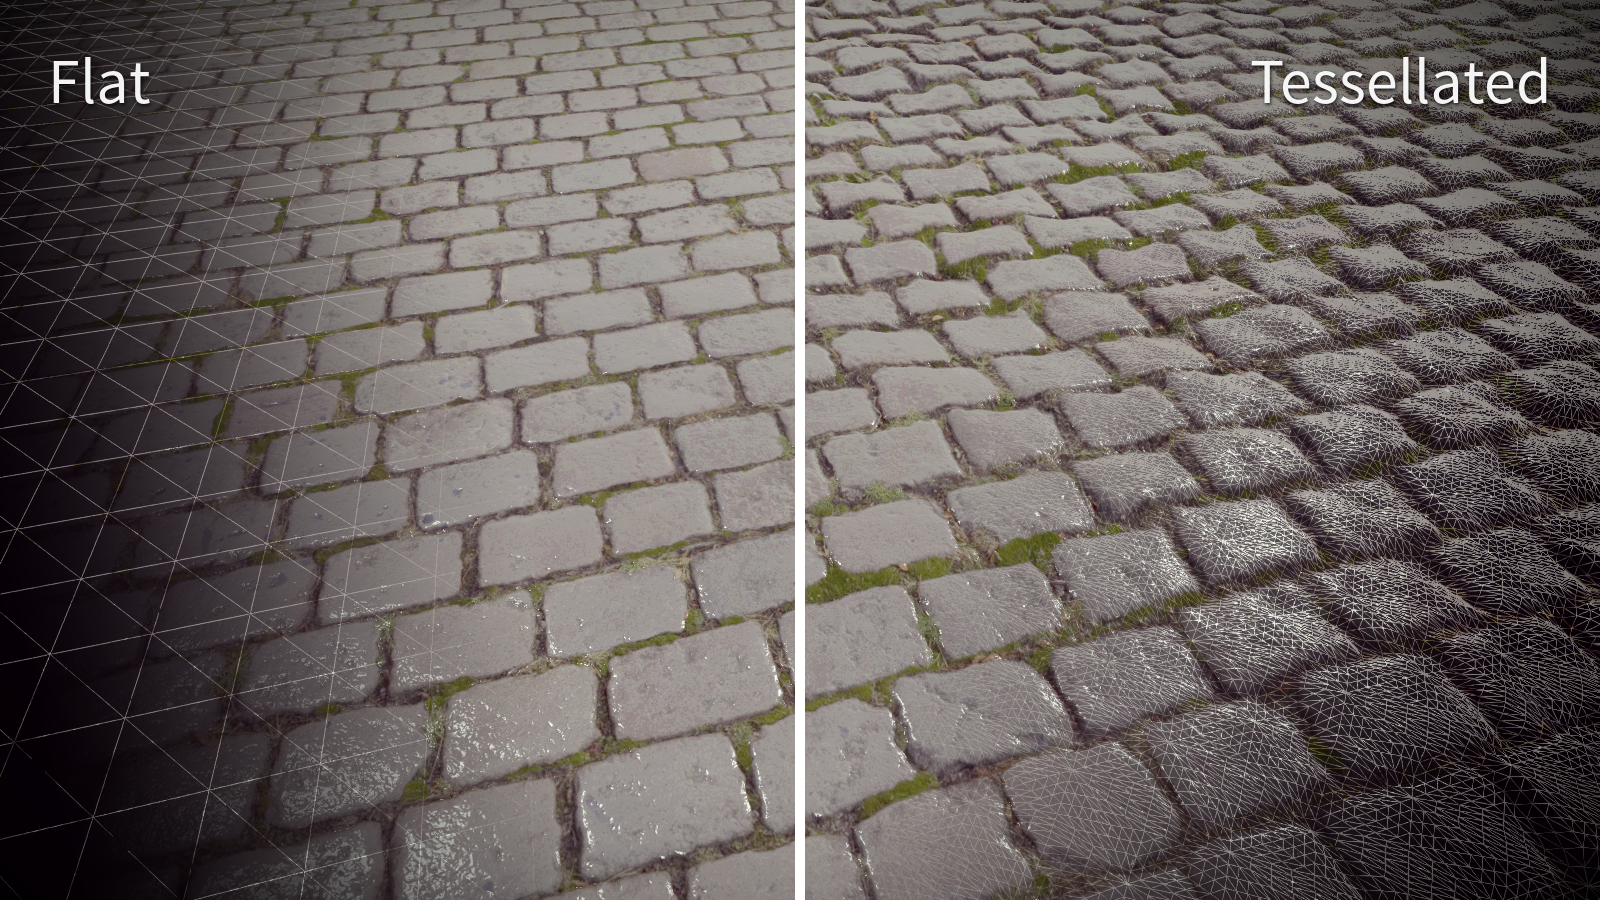
Tessellation shaders are a way to let the GPU take a base mesh and subdivide it into more densely tessellated geometry. It is possible to use a simple base mesh and subdivide it to immensely detailed proportions with a tessellation shader, unburdened by the narrow bandwidth between the GPU and the CPU. Their programmable nature allows for continuous and highly dynamic level of detail without popping artifacts.
To enable tessellation, you have to provide two new types of shader: the control shader, which specifies which control points to subdivide and how many times to subdivide each part of the patch, and the evaluation shader, which then specifies what to do with the tessellated vertices. (They are respectively called a “hull shader” and a “domain shader” in Direct3D parlance.) They are used with a new type of primitive, GeomPatches, which can contain any number of vertices. There are helpful methods for automatically converting existing geometry into patches.
One immediately obvious application is LOD-based terrain or water rendering. Only a small number of patches has to be uploaded to the GPU, after which a tesselation control shader can subdivide the patches by an amount that is calculated based on the distance to the camera. In the tesselation evaluation shader, the desired height can be calculated either based on a height map texture or based on procedural algorithms, or a combination thereof.
Another application is displacement mapping, where an existing mesh is subdivided on the GPU and a displacement map is used to displace the vertices of the subdivided mesh. This allows for showing very high-detailed meshes with dynamic level of detail even when the actual base mesh is very low-poly. Panda3D exposes methods that can be used for converting existing triangle geometry to patches to make it easier to apply this technique. Alternatively, this can be done by way of a new primitive type supported by the egg loader.
Both methods are demonstrated in the screenshots below. Click to enlarge.
Thanks to David Rose for implementing this feature! Support for tesselation shaders is available in the development builds.
Compute shaders
Besides the new tessellation shaders mentioned earlier, Panda3D supports vertex shaders, geometry shaders, and fragment shaders. All of these shaders are designed to perform a very particular task in the rendering pipeline, and as such work on a specific set of data, such as the vertices in a geometry mesh or pixels in a framebuffer.
However, because each shader is designed to do a very specific task, it can be difficult to write shaders to do things that the graphics card manufacturer didn’t plan for. Sometimes one might want to implement a fancy ray tracing algorithm or an erosion simulation, or simply make a small modification to a texture on the GPU. These things may require code to be invoked on the GPU at will, and be able to operate on something other than the vertices in a mesh or fragments in a framebuffer.
Enter compute shaders: a type of shader program that is general purpose and can perform a wide variety of tasks on the video card. Somewhat comparable to OpenCL programs, they can be invoked at any point during the rendering process, operating on a completely user-defined set of inputs. Their flexibility allows them to perform a lot of the tasks one might be used to implementing on the CPU or via a render-to-texture buffer. Compute shaders are particularly interesting for parallelizable tasks like physics simulations, global illumination computation, and tiled rendering; but also for simpler tasks like generating a procedural texture or otherwise modifying the contents of a texture on the GPU.
Of note is to mention that a lot of these tasks require another GLSL feature that we’ve added: ARB_image_load_store. This means that it’s not only possible to sample textures in a shader, but also perform direct read and write operations on a texture image. This is particularly useful for compute shaders, but this feature can be used in any type of shader. That means that you can now write to textures from a regular fragment or vertex shader as well.
If you’d like to get into the details, you can read this manual page. Or, if you’re feeling adventurous, you can always check out a development build of Panda3D and try it out for yourself.
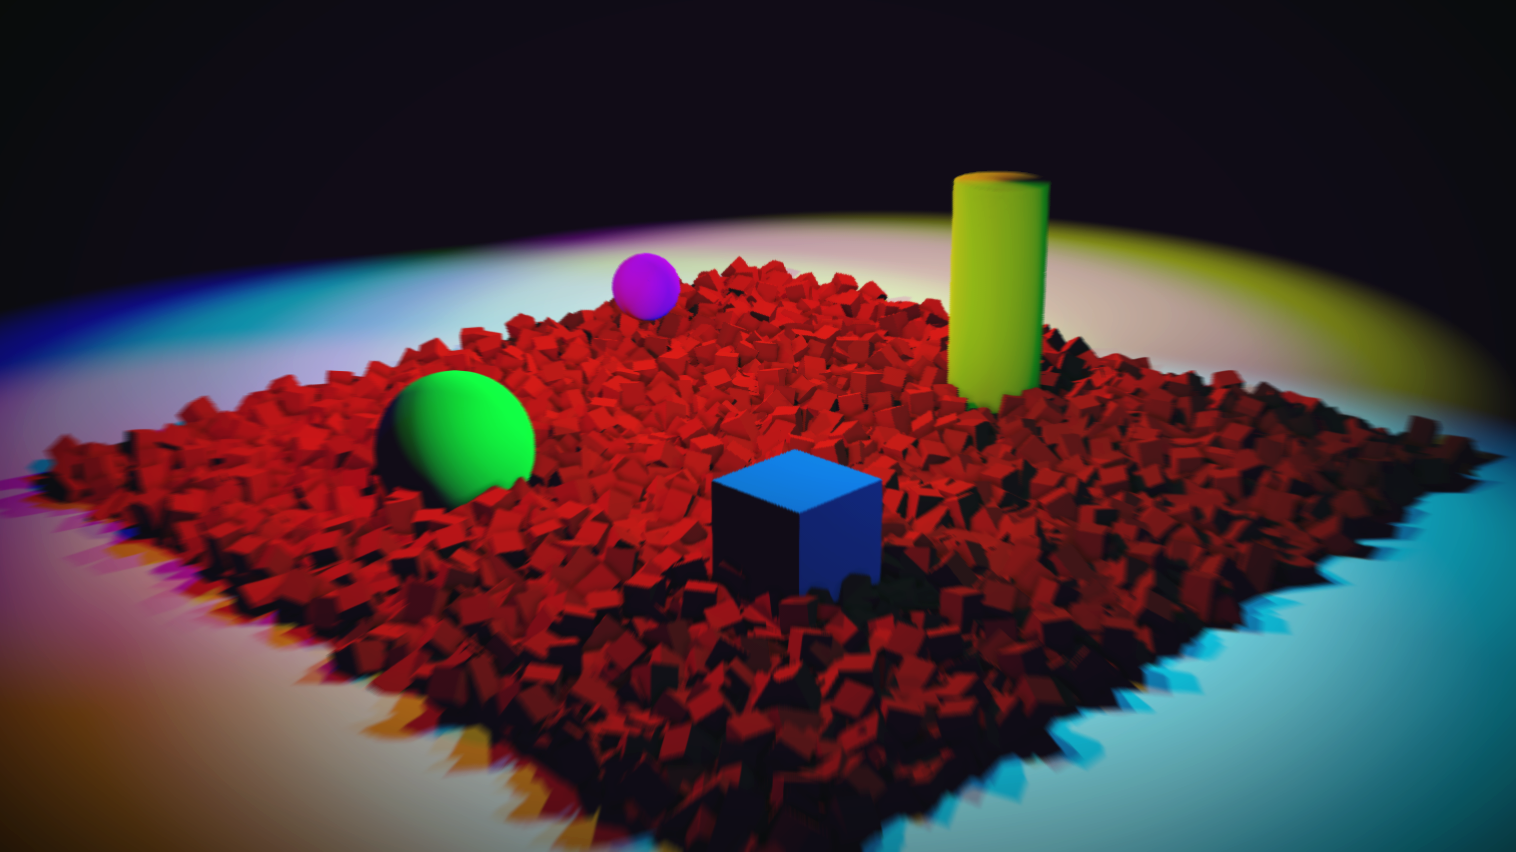
In the following screenshots, compute shaders have been used to implement voxel cone tracing: a type of real-time ray tracing algorithm that provides global illumination and soft reflections. Click here to see a video of it in action in Panda3D.
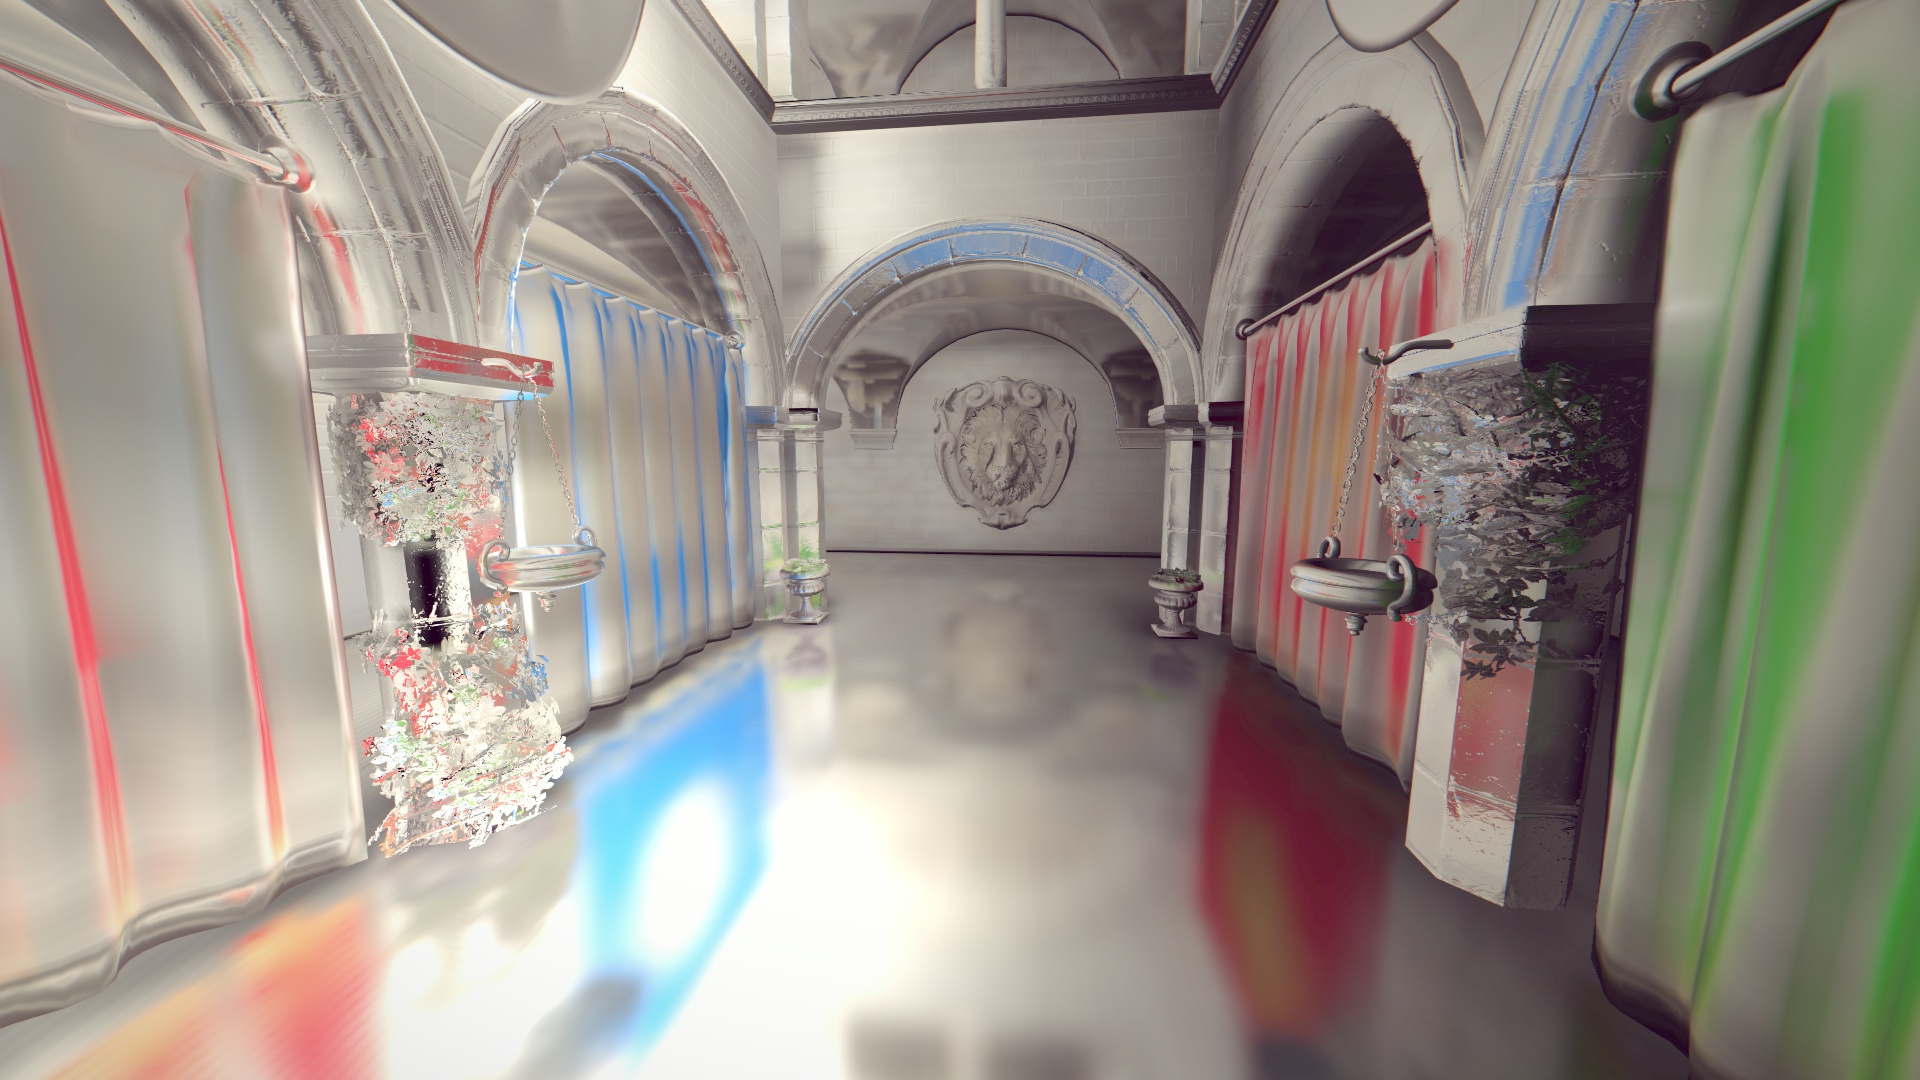
The scene on the left is based on a model by Matthew Wong and the scene on the right makes use of the famous Sponza model by Crytek.
Render-to-texture features
We’ve made various enhancements to the render-to-texture functionality by making it possible to render directly to texture arrays, cube maps, and 3D textures. Previously, separate rendering passes were needed to render to each layer, but you can now bind the entire texture and render to it in one go. Using a geometry shader, one selects the layer of the texture to render to, which can be combined with geometry instancing to duplicate the geometry onto the different layers, depending on the desired effect.
One technique where this is immediately useful is cube map rendering (such as in point light shadows), where the geometry can be instanced across all six cube map faces in one rendering pass. This improves performance tremendously by eliminating the need to issue the rendering calls to the GPU six times.
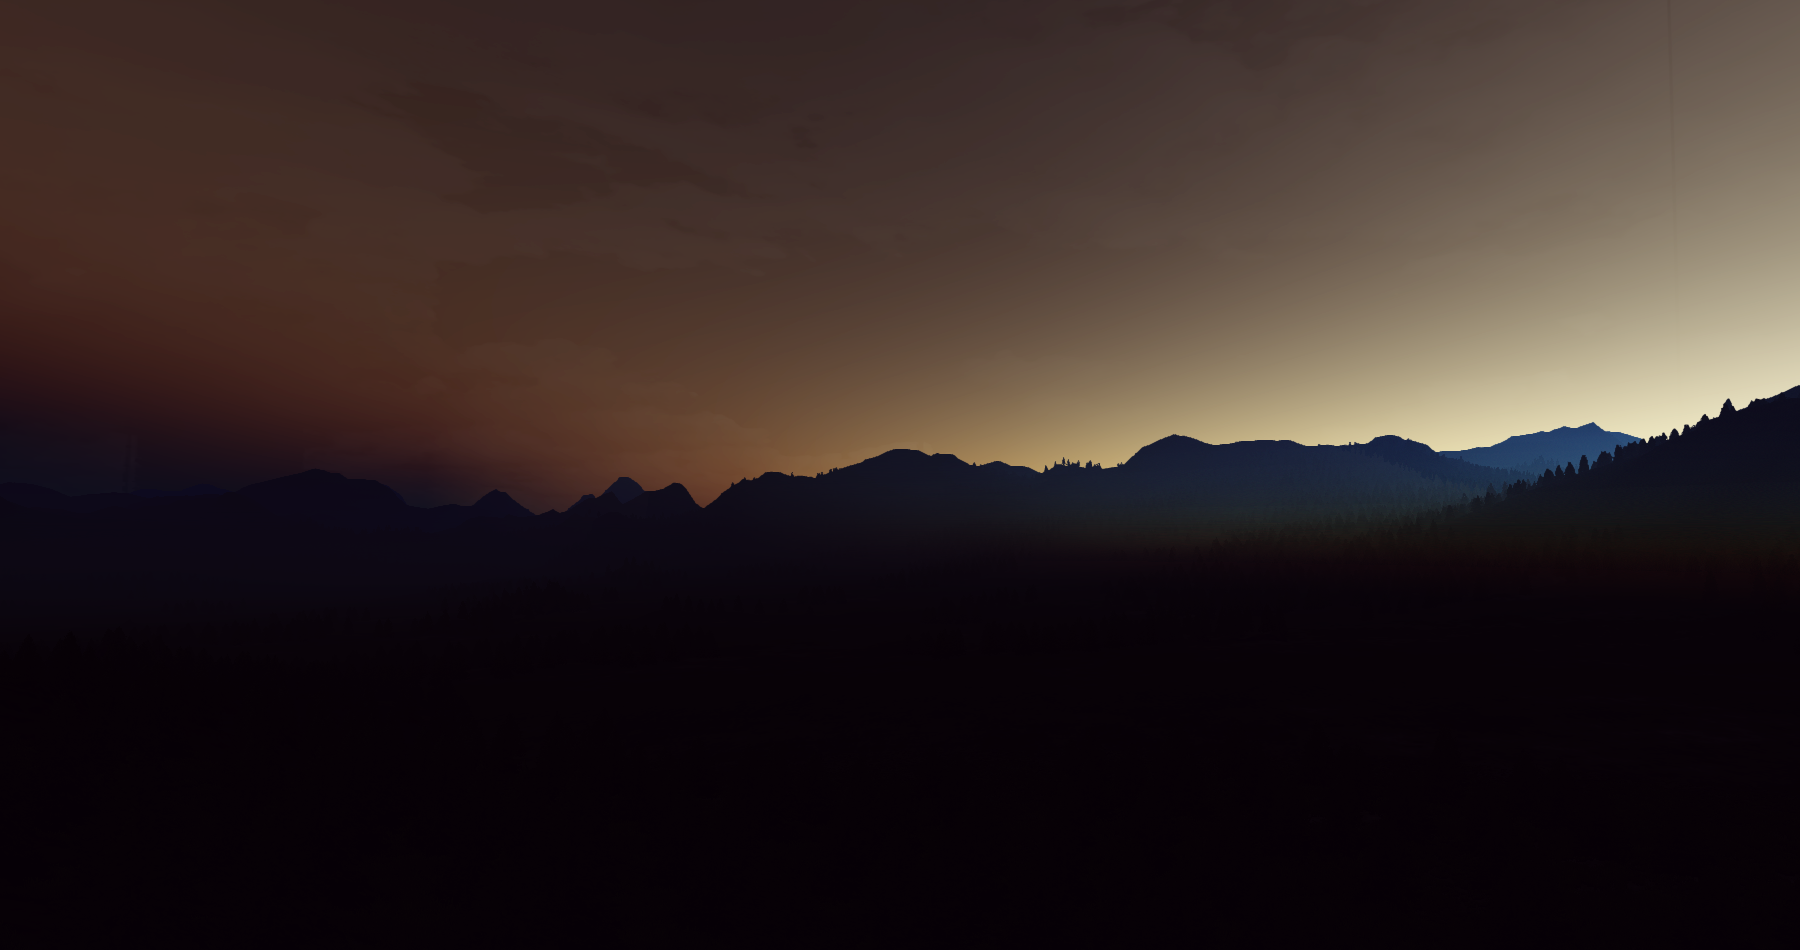
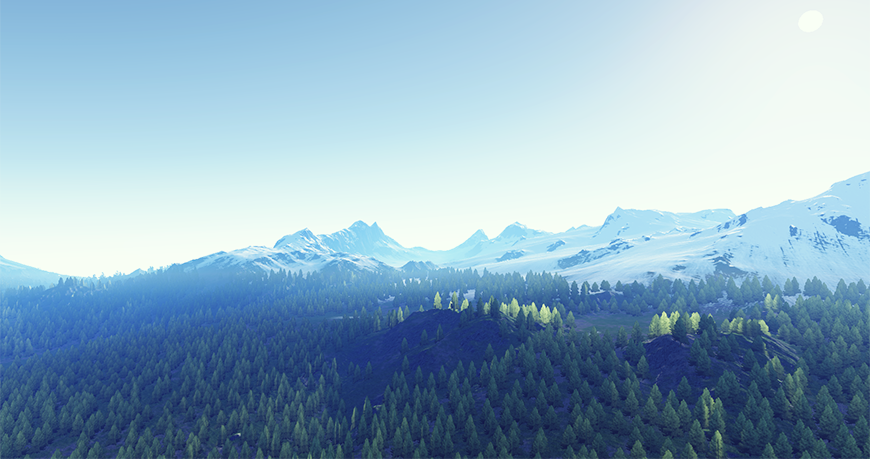
In the screenshots below, however, layered rendering is used to render the various components of an atmospheric scattering model into different layers of a 3D texture. Click to enlarge.
It is now also possible to use viewport arrays to render to different parts of a texture at once, though support for this is still experimental. As with layered render-to-texture, the viewport to render into is selected by writing to a special output variable in the geometry shader. This makes it possible to render into various parts of a texture atlas or render to different areas of the screen within the same rendering pass.
In the screenshots below, it is used to render the shadow maps of different cameras into one big shadow atlas, allowing the rendering of many shadow-casting lights in one rendering pass. The advantages of this approach are that parts of the texture can be rendered to on-demand, so that the number of shadow casters updating within one frame can be effectively limited, as well as the fact that different lights can use a different resolution shadow map.
Stereo FBOs
We’ve long supported stereoscopic rendering and Panda3D could already take advantage of specialized stereo hardware. But now, as part of the development toward Oculus Rift support, we’ve made it possible to create a buffer on any hardware that will automatically render both left and right views when associated with a stereoscopic camera, making it possible to create postprocessing effects in your stereoscopic application without having to create two separate buffers.
With the multiview texture support introduced in Panda3D 1.8, a single texture object can contain both left and right views, and Panda3D automatically knows which view to use. This makes enabling stereo rendering in an application that uses post-processing filters very straightforward, without needing to set up two separate buffers or textures for each view, and it can be enabled or disabled at the flick of a switch.
Debugging and profiling features
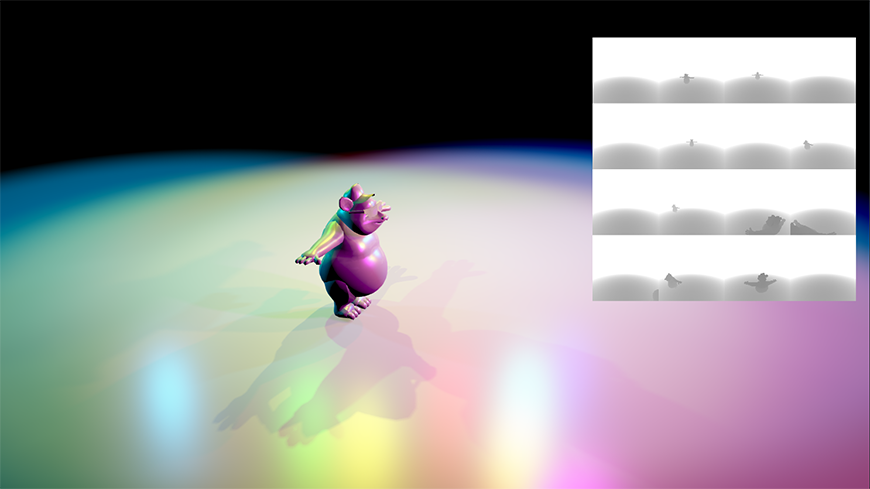
We now take advantage of timer query support with the new GPU profiling feature added to PStats: Panda3D can now ask the driver to measure how much time the draw operations actually take to complete, rather than the CPU time it takes to issue the commands. This feature is instrumental in finding performance bottlenecks in the rendering pipeline by letting you know exactly which parts of the process take the longest.
The reason this feature is important is that PStats currently only displays the time it takes for the OpenGL drawing functions to finish. Most OpenGL functions, however, only cause the commands to be queued up to be sent to the GPU later, and return almost immediately. This makes the performance statistics very misleading, and makes it very difficult to track down bottlenecks in the draw thread. By inserting timer queries into the command stream, and asking for the results thereof a few frames later, we know how much time the commands actually take without significantly delaying the rendering pipeline.
It is also possible to measure the command latency, which is the time that it takes for the GPU to catch up with the CPU and process the draw commands that the CPU has issued.
This feature is available in current development builds. The documentation about this feature is forthcoming.
Other features
This blog post is by no means a comprehensive listing of all the features that will be available in the new version, but here are a few other features we thought were worth mentioning:
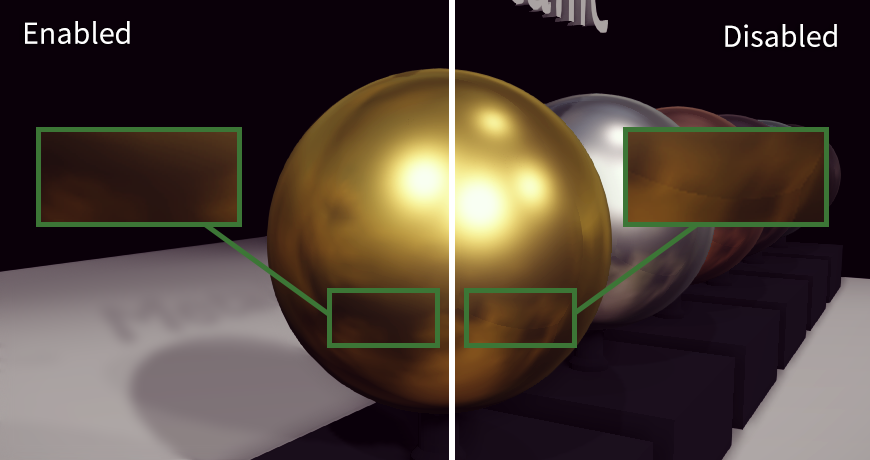 Comparison of cube mapping with and without seamless mode enabled
- We’ve added support for seamless cube maps, to eliminate the seams that can appear up on the edges of cube maps, especially at lower mip map levels. This is enabled by default, assuming that the driver indicates support.
- We also added support for the new KHR_debug and ARB_debug_output extensions, which give much more fine-grained and detailed debugging information when something goes wrong.
- We’ve added a range of performance improvements, and we’ve got even more planned!
- We’ve made it even easier to write GLSL shaders by adding more shader inputs that Panda3D can provide. This includes not only built-in inputs containing render attributes, but also a greater amount of custom input types, such as integer data types and matrix arrays.
- Line segments are now supported in a single draw call through use of a primitive restart index (also known as a strip-cut index), improving line drawing performance.
- It is now possible to access integer vertex data using ivec and uvec data types, and create textures with an integer format (particularly useful for atomic access from compute shaders).
- In the fixed-function pipeline, the diffuse lighting component is now calculated separately from the specular lighting component. This means that the specular highlight will no longer be tinted by the diffuse color. This is usually more desirable and better matches up with Direct3D behavior. The old effect can still be obtained by multiplying the diffuse color into the specular color, or by disabling a configuration flag.
Special thanks go to Tobias Springer, who has been using some of the new features in his project, for graciously contributing the screenshots for some of the listed features. His results with Panda3D look amazing!
Love the new features and love the screenshots.
TBH ive switched to another engine last year because of the road Disney and CMU were going with Panda3D it seemed like the least updated open source library I was using.
Maybe things are changing.
Don’t want to be rude and ask for more features right after this blog post you made and have this the first comment, but I’d like to list few features which made me switch to another engine for some projects and which I’d love to see in Panda:
1) Scene editor. Few people tried writing one during the years, none was completed. Come on guys…
2) More included shaders, shader mixing (ala ShaderGenerator working with with your own shaders) and shader editor.
For example its cool that you’ve added tessellation shader support, but why not provide the shader instead of letting us provide our own? This is also the case with instancing with Panda3D. Other engines don’t require you to know shader programming anymore to get such effects in your game.
3) mobile platforms
This, along with outdated demos, is all I believe keeping Panda3D from becoming more popular.
At least this is the few of us in our team have concluded.
Panda3D is still awesome and I’m using it for rapid prototyping.But I hope it will become even more awesome, there’s so much potential for an open source engine like this using Python.
This post has aroused my interest. I’ll check out Panda when the new version is ready. I’m just a bit intimidated about point 2) that jonjack mentioned above, because I have hardly any experience with shader programming yet.
Thanks for the comments! Your feedback is much appreciated.
These are all good points, and I can assure you that we’re dedicated to working towards fixing them.
The shader system in particular is one of the higher priorities that I’ll be working on after 1.9 is out. This includes a more automatic hardware instancing system.
I have been working on a design for a more general solution that will allow people to easily construct their own shaders from basic components provided by Panda3D, which will help people to get these fancy effects without having to write a line of shader code. Perhaps we will offer some sort of node-based shader editor in the future.
The problem with spending time to create good-looking demo programs is that any time spent writing those is taken away from time spent programming on the actual engine. That said, I do understand that creating good demos and sample programs is instrumental in attracting people to the engine, both users and contributors.
Thanks for the information rdb.
I think there’s another open source engine which has a shader editor which you could use as reference. I don’t want to post a link to another engine here though.
As for making good looking demo programs, I’ve heard that argument before and while it was true 6 years ago, I think there are plenty of good royalty free models around today.
We really need good demos, not many people will bother checking the API to find out what Panda3D can do after reading “To learn more about Panda3D’s capabilities, visit the gallery” on the main page, checking the gallery and seeing very old game screenshots.
And btw, the 3 games screenshots on the main webpage lead to wrong links when clicked.
Did I hear Oculus Rift? Sweet.
rdb, These demos are astonishing! If you publish some samples like these, I guarantee you’ll grab the attention of new contributors. I only lament that my C++ isn’t up to par or I’d try to help out.
> I think there are plenty of good royalty free models around today.
jonjack, maybe something from BlendSwap? I suspect there’s *something* there that’d be perfect for a cool demo.
Yes,BlendSwap.com would be the best place to look for creative commons or public domain assets.
It has a special category for realtime models which will require less editing, though there are great models in other categories as well which would be great after some editing (and by that I mean mostly removing stuff from a model, not adding anything).
http://www.blendswap.com/category/real-time/
http://www.blendswap.com/category/characters
http://www.blendswap.com/category/scenes
http://www.blendswap.com/category/landscapes
Here are few models I like personally:
cel shading example: http://www.blendswap.com/blends/view/75918
woods (Roaming Ralph?): http://www.blendswap.com/blends/view/74844
cute room (shaders/filters sample?): http://www.blendswap.com/blends/view/73996
indoor: http://www.blendswap.com/blends/view/71409
dining room (shaders and/or lights sample?): http://www.blendswap.com/blends/view/72725
rocks, trees: http://www.blendswap.com/blends/view/68349
http://www.blendswap.com/blends/view/68348
cool head: http://www.blendswap.com/blends/view/40095
My comment got removed for some reason.
I don’t have the time to find the models again, but yes, basically blendswap is probably the best place to find royalty free or creative commons models.
There’s a “realtime” category with some nice characters and scenes meant for realtime rendering. Also “character”, “scenery” and “landscape” categories with models which will look great in Panda after just a bit of editing (removing some materials and stuff).
Your comment was marked as spam by our automated spam catcher (probably due to the promotion of a web site accompanied by a lot of links-it’s not surprising that it would trigger.) I’ve manually restored it.
Thanks! I’ll be sure to give it some consideration. If not for 1.9.0, then for a future release of Panda3D.
Please Panda3D team port your python from 2 to 3
@NewDev: We’ve been working on that as well, in fact! We’ve made a lot of progress toward Python 3 support, and in fact, have (extremely experimental) support going on in the development repository.
Visit this thread for more information:
https://www.panda3d.org/forums/viewtopic.php?f=9&t=15729
Hi, i was wondering about the status of HMD support (such as e.g. OSVR or Oculus Rift)? Cheers.
Wow that looks great!
I read this post completely on the topic of the comparison of most recent and previous technologies,
it’s awesome article.